Business-critical software solutions must have a
disaster recovery plan in order to protect against major system
disruptions. A disaster recovery plan must include steps to bring the
backup site online as well as steps to deal with potential data loss as a
result of the major system disruption. BizTalk Server 2006-based
solutions require a comprehensive disaster recovery plan that covers
both the BizTalk servers and the BizTalk Group running in SQL Server.
BizTalk Server 2006 disaster recovery requirements include the
following:
BizTalk Server 2006 Log Shipping configuration for disaster recovery
BizTalk Server 2006 Log Shipping procedures for restoring the BizTalk Group as part of disaster recovery
BizTalk runtime environment disaster recovery procedures
These items make up the
core disaster recovery requirements for BizTalk Server 2006. Additional
disaster recovery procedures are required for any additional application
databases, application code, other middleware products, etc.
NOTE
Application
teams must plan to test disaster recovery procedures before entering
production and on a recurring basis to ensure current operations
personnel understand the process and can implement it successfully.
There is better
automation of the required tasks to configure and implement disaster
recovery for a BizTalk Server 2006 solution that helps to simplify the
process. Also, the BizTalk Server 2006 core documentation greatly
increases the amount of documentation regarding BizTalk Server Log
Shipping and disaster recovery. The procedures in this section are based
on the product documentation and should be reviewed along with thisarticle . In addition, this section details additional configure steps
encountered while testing out the procedures not found in the BizTalk
Server 2006 core documentation.
|
The steps to
manually update the required database fields in order to move a BizTalk
Group to a new set of database server instances without using BizTalk
Log Shipping are not documented for BizTalk Server 2006. Therefore we
strongly recommend configuring BizTalk Log Shipping as part of any
BizTalk Server 2006 production environment.
|
|
Next, let's take a look at how BizTalk Log Shipping works.
How Does BizTalk Log Shipping Work?
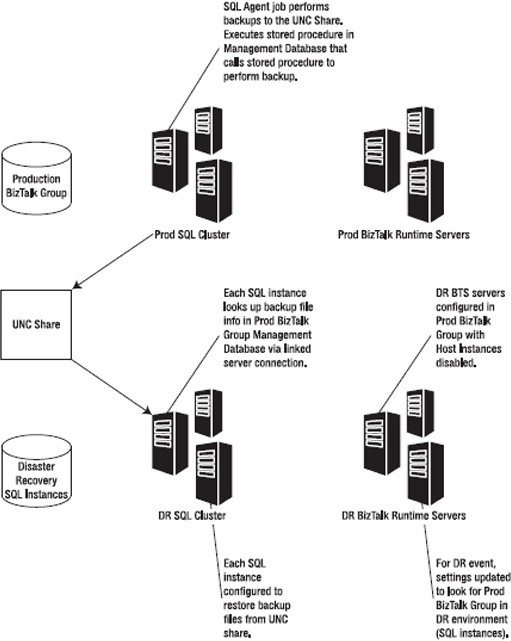
Because BizTalk
Server 2006 implements distributed transactions between BizTalk
databases in the BizTalk Group through log marks, typical SQL Server
disaster recovery technology such as SQL Server Log Shipping cannot be
used for BizTalk databases that participate in DTC transactions.
Therefore, BizTalk Server 2006 provides BizTalk Log Shipping.
|
When referring to BizTalk Log Shipping, the source system is the production SQL Server database instances and the destination system is the disaster recovery SQL Server database instances.
|
|
BizTalk Log
Shipping uses capabilities within SQL Server that takes into account log
marks and DTC transactions while providing very similar functionality
to SQL Server Log Shipping. As with SQL Server Log Shipping, BizTalk Log
Shipping performs log backups at the specified interval in the Backup
BizTalk Server SQL Agent job. The log backups are then continuously
applied to a SQL Server instance that is the disaster recovery server.
The primary difference
between SQL Log Shipping and BizTalk Log Shipping is that when
performing a disaster recovery event with BizTalk Group databases, the
last log is applied with the STOPATMARK SQL Server RESTORE
command option to restore all databases to the same point by the SQL
Agent job named BTS Log Shipping—Restore To Mark for each database
instance in the destination system. Figure 1 describes how BizTalk Log Shipping works.
When the disaster
recovery SQL Server instances in the destination system are configured
for BizTalk Log Shipping, the backup files created by the Backup BizTalk
SQL Agent job are restored at the disaster recovery site every 15
minutes. The backup files are copied over the network by a SQL RESTORE command. Full backup files are only copied in the following situations:
When BizTalk Log Shipping is first configured
When a new database is added to the BizTalk Log Shipping SQL Agent job
When a RESTORE failure occurs
Each SQL instance at the
disaster recovery site is configured individually as part of BizTalk Log
Shipping. When a SQL instance is configured for BizTalk Log Shipping
and the SQL Agent job is enabled, the SQL Agent job will connect to the
management database on the production BizTalk Group, find the most
recent full backup set at the UNC share, and attempt to restore the
database.
NOTE
If you move the full
or log backups for a source database from the location in which the
Backup BizTalk Server job put them, the associated row for that database
in the bts_LogShippingDatabases table on the destination system must be
updated by setting LogFileLocation or DBFileLocation to the new
location where the destination system should retrieve them. By default
these values are Null, which tells the destination system to read the
backup files from the location stored in the adm_BackupHistory table.
On the disaster
recovery SQL instances configured for BizTalk Log Shipping, the
databases will be displayed in a "loading" state in SQL Server 2000 and
"restoring" state in SQL Server 2005. This is because the last log in a
backup set is never restored automatically. Once a new log is available,
BizTalk Log Shipping restores the next-to-last log. When a disaster
recovery event occurs and the disaster recovery site must be brought
online, the last log is restored automatically using the STOPATMARK
command by the SQL Agent job named BTS Log Shipping—Restore To Mark on
each destination system SQL instance to recover the databases, and the
databases will no longer be in a "loading" or "restoring" state
BizTalk Server 2006
Log Shipping supports two scenarios: In one scenario, all databases on
all BizTalk databases on all production SQL server instances are
log-shipped to a single disaster recovery SQL server database instance.
The other scenario maps all source databases on each source SQL Server
instance to an associated destination SQL Server instance. Note that it
is fully supported to have the same number of SQL Server database
instances in the disaster recovery site as there is in production, but
on fewer physical servers—i.e., it is not required to have the same
number of physical servers, just the same number of database instances
for the second option.
The next subsection covers configuration of the destination system SQL Server instance for BizTalk Log Shipping.
Configuring the Destination System for Log Shipping
Here we cover the steps
to configure BizTalk Log Shipping. As mentioned previously, ensure that
the same path where database files are located in production exists on
the destination system. So, in the earlier example where there are three
SQL Server database instances in production, all three database
instances must store the database files (MDF and LDF files) in the same
path on each server, and this path must also exist on the destination
system SQL Server database instances. The database file path can be set
or changed within SQL Server.
Another
configuration step on the destination system SQL instances is to create a
linked server that points to the source system SQL instances. There
should be a linked server created that points to the production SQL
instance hosting the management database. This will allow the SQL Agent
job running on the destination system SQL Server instances to access the
BizTalk Management Database to retrieve the backup history and database
and log backup file location.
|
A key requirement for
BizTalk Log Shipping to function is that the same file path where the
BizTalk database files (MDF and LDF files) are installed must exist on
the destination system. Therefore, if a database in the production
BizTalk Group is stored at F:\Data, the drive/path F:\Data must exist on
the server where the destination system SQL Server instance is
configured. Otherwise, an error message similar to this one will occur:
"File 'DBFileName' cannot be restored to 'drive\path'. Use WITH MOVE to
identify a valid location for the file." BizTalk Log Shipping does not support WITH MOVE, so the path must be present on the destination system for BizTalk Log Shipping to work.
|
|
NOTE
Path
references to Microsoft BizTalk Server 2006 may actually be located in
the Microsoft BizTalk Server 2004 directory if an in-place upgrade was
performed when BizTalk Server 2006 was installed.
Follow these steps to configure BizTalk Log Shipping:
In
either ISQL on SQL Server 2000 or in SQL Management Studio on SQL
Server 2005, open a query window to execute a SQL file. Connect to the
SQL instance on the destination system that must be configured for Log
Shipping.
Select File =>
Open, and then browse to the location of the script LogShipping_
Destination_Schema.sql. This script is located on the drive where
BizTalk Server 2006 is installed in the following default directory
location: \Program Files\Microsoft BizTalk Server
2006\Schema\LogShipping_Destination_Schema.sql.
Select File =>Open,
and then browse to the following SQL script LogShipping_
Destination_Logic.sql. This script is located on the drive where BizTalk
Server 2006 is installed in the following directory: \Program
Files\Microsoft BizTalk Server 2006\
Schema\LogShipping_Destination_Logic.sql.
NOTE
This script is
located on the server where BizTalk Server 2006 is installed in the
directory \Program Files\Microsoft BizTalk Server 2006\Schema\ by
default, so you may need to copy it to the SQL Server machine.
In
SQL Server 2005 or in SQL Server 2000 SP4 or later, the Ad Hoc
Distributed Queries option is disabled by default. This must be enabled
on the destination system or disaster recovery SQL Server database
instances in order to allow the disaster recovery SQL Server database
instances to perform the necessary steps. To enable this option, execute
the following SQL command in the master database on each production SQL
Server database instance:
sp_configure 'show advanced options', 1;
GO
RECONFIGURE;
GO
sp_configure 'Ad Hoc Distributed Queries',1;
GO
RECONFIGURE
GO
To confirm the change, run this query to view the configured value:
SELECT * FROM sys.configurations ORDER BY name
Ad Hoc Distributed Queries should now be set to a value of 1.
Open a new query window and enter the following command:
exec bts_ConfigureBizTalkLogShipping @nvcDescription =
'<MyLogShippingSolution>',
@nvcMgmtDatabaseName = '<BizTalkServerManagementDatabaseName>',
@nvcMgmtServerName = '<BizTalkServerManagementDatabaseServer>',
@SourceServerName = null,
-- null indicates that this destination server restores all databases
@fLinkServers = 1
-- 1 automatically links the server to the management database
Replace <MyLogShippingSolution> in the preceding command with a description of the solution, surrounded by single quotes. Also, replace <BizTalkServerManagement DatabaseName> and <BizTalkServerManagementDatabaseServer> with the name and location of your source BizTalk Management Database, surrounded by single quotes.
If
there are multiple SQL Server instances in the source system, each
source SQL instance can be restored to its own destination SQL instance.
On each SQL instance in the destination system, run the preceding
scripts and command, but in the @SourceServerName = null parameter, replace null with the name of the appropriate source server, surrounded by single quotes: @SourceServerName = 'SQLSvrInstance1'.
Execute
the preceding command in the query window. The BizTalk Server 2006
documentation has this information: If the command fails, after you fix
the problem with the query, you must start over from step 1 of this
procedure to reconfigure the destination system.
NOTE
When you
execute the preceding command, this warning will occur, which can be
ignored: "Warning: The table '#Servers' has been created but its maximum
row size (25059) exceeds the maximum number of bytes per row (8060).
INSERT or UPDATE of a row in this table will fail if the resulting row
length exceeds 8060 bytes."
View
the Jobs node in either Enterprise Manager or SQL Management Studio
depending on which version of SQL you are running. There will be three
new jobs:
BTS Log Shipping Get Backup History:
This SQL Agent job copies backup history records from the source system
to the destination every minute, and it is enabled by default.
BTS Log Shipping Restore Databases:
This SQL Agent job restores backup files for the specified databases
from the source system SQL Server instance on to the destination system
SQL Server instance. It is enabled by default and runs continuously.
BTS Log Shipping Restore To Mark:
This SQL Agent job restores all of the databases to a log mark in the
last log backup. It ensures that all databases are transitionally
consistent. It also re-creates the SQL Server SQL Agent jobs on the
destination system saving the administrator from having to manually
re-create the SQL Agent jobs running on the source system.
Create
SQL Server security logins for the disaster recovery site that
correspond to the production site so that in the event that a failover
to the disaster recovery site is required, all required security logins
are present on the destination system.
Once
everything is configured, check the status of the newly created SQL
Agent jobs to make sure that they are running successfully. Here are a
couple of items to check in the event a SQL Agent job is failing:
Ensure that the system time and time zone are consistent between all servers.
Ensure that the job has the correct account as the owner.
Ensure that NETWORK COM+ and NETWORK DTC are enabled in Add/Remove Windows Components.
Ensure that the MSDTC security configuration in Control Panel => Administrative Tools =>
Component Services is configured correctly for your environment. Try
checking Network DTC Access, Allow Remote Clients, and Transaction
Manager Communication Allow Inbound and Allow Outbound to see if doing
so resolves connectivity issues.
The last step is to edit the update scripts and XML files to prepare for a disaster recovery event by following these steps:
On
a computer running BizTalk Server 2006, browse to the following folder:
\Program Files\Microsoft BizTalk Server 2006\Schema\Restore.
Right-click SampleUpdateInfo.xml, and then click Edit.
For
each database listed, replace "SourceServer" with the name of the
source system SQL Server database instance, and then replace
"DestinationServer" with the name of the destination system SQL Server
instance.
|
Do not perform a
blanket search and replace, since databases may be present on different
SQL Server instances in the source system and may be restored to
different SQL Server instances in the destination system. Be sure to
include the quotation marks around the name of the source and
destination SQL Server instances. Also, if you renamed any of the
BizTalk Server databases, you must also update the database names as
appropriate.
|
|
If you have more than one Messagebox database in the source system, add another MessageBoxDB line to the list, and then set IsMaster="0" for the non-master databases.
If the source system is using BAM, HWS, SSO, the Rules Engine, or EDI, uncomment these lines as appropriate.
If
custom databases have been added to the Backup BizTalk Server SQL Agent
job, add the custom databases as appropriate under the
<OtherDatabases> section.
When finished editing the file, save it and exit.
This completes the
configuration of BizTalk Log Shipping. The next two subsections cover
disaster recovery procedures for the BizTalk Group and for BizTalk
servers, respectively.
BizTalk Group Disaster Recovery Procedures
This discussion
assumes that BizTalk Log Shipping is configured and working correctly by
following the guidance in the earlier subsection titled "Configuring
the Backup BizTalk Server SQL Agent Job" as well as the guidance in the
earlier subsection titled "Configuring the destination system for Log
Shipping." Once that is verified, the next step is to prepare for
performing a disaster recovery event. A disaster recovery event for the
BizTalk Group consists of restoring the BizTalk Group databases as well
as related non-BizTalk databases on the Destination System SQL Server
instances. This also includes any DTS packages as well as SQL Agent jobs
that exist in the source system (production).
The first step is to ensure
that the last backup set has been restored to all SQL Server instances
that are part of the destination system. This can be confirmed by
reviewing the Master.dbo.bts_LogShippingHistory table that is populated
by the Get Backup History SQL Agent job. When a backup is successfully
restored, the Restored column is set to 1 and the RestoreDateTime is set
to the date/time the restore was completed. When all of the databases
that are part of a backup set have been successfully restored, the
backup set ID is written to the Master.dbo.bts_LogShippingLastRestoreSet
table. Once you have confirmed that available backup files have been
applied, follow these steps on each SQL Server instance in the
destination system:
Depending on whether you are on SQL Server 2000 or SQL Server 2005, navigate to the SQL Agent Jobs view.
Right-click and select Disable Job to disable the following SQL Agent jobs:
Right-click BTS Log Shipping—Restore To Mark and select Start Job.
Once
you have verified that the job BTS Log Shipping—Restore To Mark has
completed, copy the script and XML files UpdateDatabase.vbs and
SampleUpdateInfo.xml to the server where the SQL Server instance is
running and execute the following command:
cscript UpdateDatabase.vbs SampleUpdateInfo.xml
NOTE
On 64-bit servers, run the UpdateDatabase.vbs script from a 64-bit command prompt.
As promised, we next
cover the disaster recovery procedures for the BizTalk runtime servers.
Later subsections cover disaster recovery procedures for BAM, BAS, and
EDI functionality.
BizTalk Runtime Server Disaster Recovery Procedures
The BizTalk runtime servers
in the destination system should have BizTalk Server 2006 as well as
any required third-party adapters or software installed using the same
guidelines for the production BizTalk runtime servers. There are
generally two methods for setting up the BizTalk runtime servers:
Method one: Restore BizTalk Group, and then configure BizTalk servers in BizTalk Group and deploy applications.
Method two:
Configure disaster recovery BizTalk servers in production BizTalk
Group, disable services, keep server up to date, and run update script
to update locations of databases in destination system.
Both methods have
advantages and disadvantages, which you'll find out more about in our
detailed discussion of these methods next.
Method One
To proceed with
method one, first verify that procedures to restore the BizTalk Group
databases and related application databases have been completed. Once
completed, proceed with restoring the BizTalk runtime servers using
method one. Method one has all software preinstalled, but not
configured, and without any applications deployed on the BizTalk servers
in the destination system. When the BizTalk Group is restored in the
destination system, and the BizTalk severs are configured using
Configuration.exe, select Join for the BizTalk Group, not Create. The
first server configured should have the master secret restored on it and
then designated as the master secret server for the BizTalk Group using
the Enterprise SSO management tools. Once all of the BizTalk servers
are configured in the BizTalk Group at the destination system, deploy
the BizTalk applications (assemblies and bindings).
While many of the steps
can be scripted, this method essentially brings online a new environment
when recovering from a disaster. At the same time, it reduces the
amount of ongoing maintenance work for the destination system to a
degree, since just the latest version of the application is deployed.
Method Two
Method two also has all
software preinstalled, but takes it a step further and actually
configures the BizTalk servers in the destination system to be member
servers in the production BizTalk Group. Applications (assemblies and
bindings) are deployed to the destination system BizTalk servers just
like in production, except that the BizTalk host instances and all other
BizTalk-related Windows Services are disabled and do not perform any
processing in the destination system. During a disaster recovery event, a
script is run on the destination system BizTalk servers to update the
new location of the BizTalk Group in the destination system SQL
instances. Once updated, processing can be enabled. Method two is
recommended because it results in a faster recovery and less change
overall. To proceed with method two, first verify that procedures to
restore the BizTalk Group databases and related application databases
have been completed.
NOTE
Path references
to Microsoft BizTalk Server 2006 may actually be located in the
Microsoft BizTalk Server 2004 directory if an in-place upgrade was
performed.
Once verification is completed, perform these steps:
Copy
the edited SampleUpdateInfo.xml file to the \Program Files\Microsoft
BizTalk Server 2006\Schema\Restore directory on every BizTalk server in
the destination system.
On each BizTalk Server, open a command prompt (must be 64-bit if on a 64-bit OS) by selecting Start => Run, typing cmd, and then clicking OK.
At
the command prompt, navigate to the location of the edited
SampleUpdateInfo.xml file and the script (\Program Files\Microsoft
BizTalk Server 2006\Schema\Restore is the default) and enter this
command:
cscript UpdateRegistry.vbs SampleUpdateInfo.xml
Enable and restart all BizTalk host instances and all other BizTalk services on the BizTalk servers in the destination system.
Restart WMI on each BizTalk server in the destination system by selecting Start => Run, typing services.msc, and clicking OK. Then right-click Windows Management Instrumentation and select Restart.
On each BizTalk server, open the BizTalk Server Administration Console, right-click BizTalk Group, and select Remove.
Right-click
BizTalk Server 2006 Administration, select Connect to Existing Group,
select the SQL Server database instance and database name that
corresponds to the BizTalk Management database for the BizTalk Group,
and click OK.
Restore
the master secret on the master secret server in the destination system
if not already completed by following the steps detailed in the
subsection titled "The Master Secret" earlier.
Next, we show you how to restore BAS, if BAS was configured in the BizTalk Group.
Restore Procedures for BAS Site and Database
This subsection covers the
procedures to restore BAS and is only required if BAS was configured in
the source system. BAS exists in a Windows SharePoint Services web
site. Refer to the Windows SharePoint Services Administrators guide for
further information, available for download here: .
If BAS is part of the BizTalk solution, follow these steps:
Restore the Windows SharePoint Services Configuration and Content databases using SQL Server tools.
Open SharePoint Central Administration and on the WSS Central Administration page, click Configure Virtual Server settings.
On the Virtual Server List page, select the WSS virtual server.
Unextend
the WSS virtual server by clicking Remove, delete Content databases by
clicking RemoveWindows SharePoint Services from virtual server on the
Virtual Server Settings page under Virtual Server Management, and then
click OK.
Click Set Configuration Database Server under Server Configuration.
On
the Set Configuration Database Server page, enter the name of the SQL
Server instance hosting the Configuration database, enter the database
name in the SQL Server Database Name field, and then select Connect to
Existing Database followed by clicking OK.
Under
Virtual Server Configuration, select Extend or upgrade virtual server,
then in the Virtual Server List, click Default Web Site.
Under Provisioning Options, click Extend and map to another virtual server.
In Extend and Map to Another Virtual Server, select Use an existing application pool, and then click OK.
On
the Virtual Server Settings page, under Virtual Server Management,
click Manage Content databases, and then on the Manage Content Databases
page, click Add a Content database.
On
the Add Content Database page, under Database Information, click
Specify database server settings. In Database server, type the name of
the restored database server name. In Database name, type the name of
the restored database.
On the Manage Content Databases page, click the previous Content database. This is the database that was backed up.
On
the Manage Content Database Settings page, under Remove Content
Database, click Remove Content database to remove this old database link
from the Manage Content Databases page.
Open the Internet Information Services Manager snap-in by selecting Start => Run and then type %SystemRoot%\system32\inetsrv\iis.msc.
Select the local computer, and then click Web Sites => Default Web Site => _layouts => <locale identifier> (1033 for En-US), right-click BAS, and then click Properties.
In
the BAS Properties dialog box, on the Directory tab, next to the
Application name box click Create, and then click OK. Verify that the
BAS application pool is unchanged after you restore the BAS site and
database.
Apply
any other Windows SharePoint Services customizations such as web.config
files, JavaScript files, site templates, etc., as required.
The next subsection covers restore procedures for Business Activity Monitoring.
Restore Procedures for BAM
The BizTalk Server
2006 documentation covers these procedures extensively so we won't
repeat them here. BAM consists of SQL Server databases, SQL Analysis
databases, and DTS packages. Refer to the section titled "Backing Up and
Restoring BAM" in the BizTalk Server 2006 documentation for the
details. It is also available online here: .
Next, we cover the restore procedures for the Base EDI adapter.
Restore Procedures for the Base EDI Adapter
The Base EDI adapter,
unlike the other adapters in BizTalk Server, has its own database and
stores files in a directory (DocumentsHome) during runtime. The
DocumentsHome directory is located here by default:
<root>\Documents and Settings\All Users\Application Data\
Microsoft\BizTalk Server 2006\EDI\SubsystemThe Base EDI adapter.
Restoring the Base EDI
adapter requires following a precise order of steps to ensure that the
system comes back online in an orderly fashion with successful message
processing and tracking from the point of failure with minimal risk of
data loss. There are three primary steps when restoring the Base EDI
adapter:
Restore the DocumentsHome directory.
Recover data and resynchronize the audit trail.
Generate the engine input file.
The detailed tasks
for the preceding steps are available in the BizTalk Server 2006 core
documentation in the section titled "Backing Up and Restoring the Base
EDI Adapter" available at this link: .
Now let's take a look at the additional tasks related to disaster recovery for a BizTalk Server solution.
Other Disaster Recovery Tasks
This subsection covers
other tasks and recommendations related to disaster recovery. Tracking data is an
important part of a BizTalk solution, since that data can be used for
reporting and as part of recordkeeping regulations compliance. It can
also be used to help recover from a disaster, because it is a record of
data processing activity. For this reason, we recommend separating your
tracking databases from the runtime databases that generate tracking
data by configuring your databases in separate SQL Server instances on
different disks in production. Data in the tracking databases can be
used to help determine the state of the system up to the point of
failure for the runtime databases. Tracked messages and events can
indicate what processes may have already happened and what messages have
been received or sent.
NOTE
Tracking data is not
written directly to the tracking databases. Instead, it is cached on the
Messageboxes and moved to the Tracking database. Therefore, in the
event of a Messagebox data loss, some tracking data may be lost as well.
The next subsection covers steps to evaluate data loss for the BizTalk Group with tips on how to recover data.
Evaluating Data Loss for the BizTalk Group
After data loss
has occurred, recovering it is often difficult or impossible. For these
reasons, using a fault-tolerant system to prevent data loss is extremely
important. In any case, a disaster may occur, and even the most
fault-tolerant system has some chance of failure. This subsection covers
methods to help determine the state of the system when the failure
occurred and how to evaluate corrective action.
Managing In-Flight Orchestrations
The Messagebox
databases contain the state of orchestrations that are currently in
progress. When data is lost from the Messagebox databases, it is not
possible to tell exactly what data has been lost. Therefore, it will be
necessary to examine external systems to see what activities have
occurred in relation to the in-progress orchestrations.
Once it is
determined what has occurred, steps can be taken to restore processes.
For example, if upon looking at external systems or logs it is
determined that an orchestration was activated but didn't performany
work, the message can be resubmitted to complete the operation.
It is important to
consider what information will be available to compare with in-flight
orchestrations in order to decide whether to terminate or resume
particular in-flight orchestrations. Available information is largely
determined by the architecture and design of the system such as what
logging is performed "out-of-band" so as to not impact performance but
at the same time provide an audit of events for comparison purposes.
Health and Activity Tracking Operations Tool
The HAT Operations
tools can be used to determine what services were active at the time the
Messagebox was recovered. Because there is a gap between the time of
the recovered database and the time of the failure, the state of these
and other transactions that may have started is in doubt and will need
to be evaluated with available information.
Health and Activity Tracking Reporting Tools
HAT provides
reporting tools for viewing system events. These tools can show which
service instances completed and started after the point of recovery. HAT
can positively report on any service that completed, and it can
indicate that a service started. However, HAT cannot reveal everything
because tracking data is first staged to the Messagebox and then moved
to the Tracking database. The data that was staged may have been lost to
the backlog of the TDDS service.
Viewing After the Log Mark in Tracking Databases
While all databases need to
be restored to the same mark for operational reasons in order to restore
a consistent BizTalk Group, administrators can use a Tracking database
that was not lost in Archive mode to see what happened after the mark.
The process of evaluating the data begins by comparing services that are
in flight in the HAT Operations views against their state in HAT
Reporting. If HAT Reporting shows it as having completed, the instances
can be terminated.
HAT Reporting may show
instances that started after the point of recovery. If so, any actions
these instances took must be compensated, and then the initial
activation messages can be submitted.
Reporting may also
show that instances have progressed beyond the point at which the
Operations view indicates. In this case, use the Orchestration Debugger
in Reporting to see the last shapes that were executed, and then use
Message Flow to see what message should have been sent or received. If
they do not match the state in the Operations view, corrective action is
required. Options are to terminate, compensate and restart, or resubmit
any lost messages.
NOTE
If the
BizTalk Tracking database is lost, all discovery of what happened past
the point of recovery will need to be done using the external system's
reporting mechanisms
Marking In-Flight Transactions As Complete in BAM
BAM maintains
data for incomplete trace instances in a special active instance table.
If some instance records were started before the last backup but
completed after the backup, those records will remain in the active
instance table because the completion records for the instance will have
been lost. Although this does not prevent the system from functioning,
it may be desirable to mark these records as completed so that they can
be moved out of the active instance table. To accomplish this, manual
intervention is necessary.
A list of
incomplete ActivityIDs for a given activity can be determined by issuing
the following query against the BAM Primary Import database:
Select ActivityID from bam_<ActivityName> where IsComplete = 0
If data from
external systems indicates that the activity instance is in fact
completed, use the following query to manually complete the instance:
exec bam_<ActivityName>_PrimaryImport @ActivityID=N'<ActivityID>', @IsStartNew=0,
@IsComplete=1
Related Non-BizTalk Application Disaster Recovery Procedures
There may be additional
non-BizTalk applications that must be restored as part of the overall
application solution. If these application databases participate in
distributed transactions with the BizTalk Group databases, the databases
should be part of the Backup BizTalk Server SQL Agent job and restored
to the same mark as the other BizTalk Group databases. In general, each
individual application should have a disaster recovery plan tailored to
the application that should be part of the overall solution disaster
recovery plan.